Tuesday, May 31, 2016

Bacon & Egg Breakfast Bundles

I've made these many times before using different combinations of deli meat and cheese (favorites: roast beef with gruyere, and spicy turkey with colby jack), but decided to try making a breakfast version with bacon, egg, and cheese.  Actually, my husband is the one that made these.  Usually I do the cooking around here, but it was my birthday, so he made these while I advised from the couch.  It was delightful!  They're nothing fancy, but they are tasty and a nice little weekend treat served with fresh fruit and creamsicle dip.
 
As mentioned before, you can put pretty much anything in these.  You could try using ham instead of the bacon, if you prefer, and use whatever cheese you want.  We made half with colby jack and half with muenster.  The muenster melted beautifully and was very stretchy like mozzarella, if that appeals to you.  If you want something for lunch or dinner, how about pepperoni and sliced or cubed mozzarella, maybe a little sprinkle of parmesan, served with marinara sauce on the side?  Leftover fajita meat and veggies with cheddar, and salsa on the side?  Keep it simple with ham and cheese, maybe with honey mustard to dip?  I'm sure all of these would work great.
 
 
Bacon & Egg Breakfast Bundles

3 eggs
4 slices cooked bacon, broken in half
4 slices cheese of your choice, broken in half
8 oz tube of crescent roll dough (leave in the refrigerator until you're ready for them)
 
Preheat oven to 350 and line a baking sheet with parchment paper.
 
Grease a small nonstick skillet, heat it over medium, crack in the eggs, and scramble with a rubber spatula until cooked.  Add salt and pepper to taste, and set aside.
 
Take the crescent roll dough out of the refrigerator.  Separate the dough into 8 triangles.  Take a triangle of dough, top it with one of the bacon halves (break it up more to fit), one of the half slices of cheese (fold it into a square so it fits), and 1/8th of the scrambled eggs.  Form a little bundle by gently stretching the bits of dough around the filling and press it shut.  The filling should be completely encased.  Set the bundle on the baking sheet and repeat with the remaining ingredients.
 
Bake bundles until golden, about 10-12 minutes.
 
Yield: 8 bundles, how many this feeds depends on what else you're serving.

Saturday, May 28, 2016

Princess Leia & Chewie Cupcakes

I'm a big Star Wars fan and made these cupcakes in honor of May 4th.  A Facebook friend posted a link to the Princess Leia cupcakes on May 3rd, and I thought they were so cute that I got to work making them almost immediately.  It appears that the Leia cupcakes are originally from the blog Just Jenn Recipes.  I made a few small changes, namely chocolate frosting instead of black (Leia's hair is brown!), Oreos with chocolate filling, mini chocolate chips for eyes, and I got to use my lip sprinkles.  My mom gave me those sprinkles a couple of years ago and I've used them for Valentine's Day manatee cookies and Lofthouse cookies, it was fun actually using them as mouths.  You could definitely use the heart shaped ones shown in the original recipe, though.
 
The Chewbacca cupcake design idea was my husband's.  They aren't super fancy, but they are cute!  While the Leia cupcakes are pretty easy, the Chewie ones are even easier and would be a great choice for children to decorate.
 
I just used a box of cake mix and canned frosting.  I fully admit to enjoying boxed cake mixes, but as I get older, the canned frosting gets grosser, particularly the vanilla flavor.  Feel free to use a buttercream frosting instead of the canned frostings.
 
Quick Note:  As I mentioned below, 1 package of the chocolate filled Oreos has 30 cookies, so enough to make 15 Leias, assuming none of the Oreos are broken.  Buy a second pack of Oreos if you want to make more Leias!  I thought it was fun to have an even number of Leias and Chewies, but you do what you want.  You will have enough frosting to make more than 12 Leias and 12 Chewies, but the exact number depends of course on how generous you are with the frosting.
 
 
Princess Leia & Chewie Cupcakes
   
1 box cake mix, big enough to make 24 cupcakes (I used strawberry flavored)
ingredients called for on cake mix box
1 can vanilla frosting
1 can chocolate frosting
mini chocolate chips (for Leia's eyes)
semi-sweet chocolate chips (for Chewie's eyes)
larger sized milk chocolate chips (for Chewie's nose)
pink food coloring
orange food coloring
long chocolate sprinkles
lip or heart shaped sprinkles
1 package chocolate cream filled Oreos (this will be enough to make 15 Leias)
  
Prepare and bake cupcakes according to directions on box.  Cool completely.
  
Add very small amounts of pink and orange food coloring to the vanilla frosting, and stir thoroughly.  This frosting is for Leia's face, so try to approximate a caucasian skin tone.  Set aside.
  
Spoon about 1/2 cup of the chocolate frosting into a sandwich sized Ziploc bag, squeeze the excess air out, seal it, and cut the very tip off one of the corners.
  
To make a Leia cupcake, spread a dollop of the peachy colored frosting over one of the cupcakes, and smooth it out.  Use the bag of chocolate frosting to make her hair.  Press two mini chocolate chips upside down into the frosting to make eyes, and a heart or lip sprinkle for the mouth.  Spread a small dollop of chocolate frosting on two of the Oreos and press them gently to the sides of the cupcake so they look like Leia's buns.  Hold them gently in place for a few seconds, then carefully move the cupcake to a safe place to dry, holding onto the Oreos.  Repeat with more cupcakes.
  
To make a Chewie cupcake, sprinkle about 1/4 C chocolate sprinkles into a cereal bowl.  Spread a dollop of chocolate frosting on a cupcake, going all the way to the edges.  Gently press the cupcake, frosting side down, into the bowl of sprinkles, making sure the frosting is completely covered.  Set the cupcake back down on the table and press in two normal sized chocolate chips (upside down) for eyes, then a big chocolate chip (again, upside down) for a nose.  Repeat with more cupcakes.
   
Yield: 24 cupcakes

Wednesday, May 25, 2016

Creamsicle Fruit Dip

This is my tweaked version of The Best Fruit Dip Ever from Iowa Girl Eats.  It's really good and I've made it twice now.  Creamy, a little tangy, nice orange flavor.  It's kind of like dipping your fruit into cheesecake!  I served it with mango, apple slices, raspberries, and grapes, and they were all really good.  My husband and I both agree that this fruit dip doesn't replace Sour Cream Fruit Dip as our favorite (he even suggested adding cinnamon to this one), but it's definitely yummy and a nice alternative.


Creamsicle Fruit Dip
 
4 oz cream cheese, softened
5 oz container plain greek yogurt
7 oz jar marshmallow fluff
3+ Tbsp frozen orange juice concentrate, thawed
milk (optional)

 
Place first 3 ingredients in the bowl of an electric mixer and beat with paddle until smooth.  Mix in orange juice concentrate.  The mixture will be quite thick, so add either more orange juice concentrate (which is what I do since we love orange flavor), milk (if you don't want it too orangey), or a combination of the two until it has about the consistency of ranch dressing.  It will firm up some in the refrigerator.
Yield:  About 12 servings

Sunday, May 22, 2016

Lemon Custard Pie

I've made this pie recipe from Taste of Home twice in the past month both because we liked it so much and because I always have the ingredients on hand.  It's apparently a chess pie, but I've never had a chess pie other than that and I'm a little reluctant to call it that since it appears that chess pies have cornmeal.  I substituted flour for the cornmeal both times I made the recipe, and it turned out great.  In all honesty, I'm suspicious of how cornmeal's grainy texture would be in this smooth pie!  So I'm calling it Lemon Custard Pie, since that's what it essentially is.  My husband and I both love lemon desserts, and this is like an extra thick lemon bar in a pie crust.  What's not to like?
 
One weird thing about this recipe is that both times I made it, the top browned VERY quickly. The first time, the top went from beginning to look ever so slightly like it was beginning to turn golden to way over done in about 8 minutes.  I actually ended up peeling the top off after it came out of the oven.  It came off very easily and the pie underneath looked perfect.  The second time, the top again started browning much too quickly, so I tried to cover it with foil, but the top glued itself to the foil and ended up dragging itself off when I removed it from the oven.  Oops!  Normally I wouldn't post a recipe with issues like that, but both times the pie underneath was fantastic, so I've decided to share it anyway.  Just be aware that your top may brown really quickly, and if it does, it's really easy to pull off!  I've included pictures below of both pies.
 
Also, be aware that this makes a rather thin pie and is not suited for a deep dish pie plate.  The pie plate I use is only about 1 1/2 inches deep inside.
  
 first pie before peeling off top
 
 first pie after peeling off top
 
 slice of second pie
 
 
Lemon Custard Pie
 
pie crust for a single layer pie (I used this recipe from Ina Garten)
4 eggs
1 1/2 C sugar
1 1/2 Tbsp flour
1/2 C lemon juice
1/4 C salted butter, melted
 
Drape pie crust into pie plate, cut off excess dough, and crimp the edges.  Place into the refrigerator while you prepare the filling.
 
Preheat oven to 350.
 
Place eggs in a large bowl and beat on medium speed for 3 minutes.  Whisk together sugar and flour until evenly incorporated.  Add the sugar mixture to the eggs in 3 additions, beating after each addition.  Beat on medium speed until mixture is bright yellow and thick, about 2 minutes.  Add lemon juice, and drizzle in the melted butter in a thin stream while mixing.  Continue to mix until well incorporated.  Pour filling into prepared pie crust.
 
Bake pie until set throughout, a toothpick inserted into the center should come out mostly clean.  An even easier way to measure this is to insert a digital probe thermometer into the pie filling about 2 inches from the edge, it should register around 210 degrees.  How long this will take really depends on your oven, but it should be about 40-50 minutes.
 
Remove pie from oven and let cool thoroughly before serving.  It's very good slightly warm, room temperature, or refrigerated, but be sure to store any leftovers in the refrigerator.  Lightly sweetened vanilla whipped cream goes great on top, too.

Yield: 8 servings

Tuesday, May 17, 2016

Cinnamon Apple Pancakes

These Cinnamon Apple Pancakes are a Secret Recipe Club recipe, but not one that I was assigned.  I was checking out recipes that other people made for SRC and came upon this one at the blog Daily Dish.  They looked so good, I had to make them!  My changes were to add salt (it doesn't make them taste salty, remember salt is a flavor enhancer) and to add more milk because the batter was very thick.  The pancakes turned out really nicely.  Lots of apple flavor and the pancakes were very moist and tender, in spite of not having any oil or butter in the batter.  We really liked them.  Next time I want to try experimenting with steaming the grated apples in a covered bowl in the microwave so they will soften up a bit.  The pancakes were definitely good as is, but the grated apple added a bit of texture, which may or may not appeal to some people.  I love tinkering with recipes!  When I try that method, I will update this post.
  
 
Cinnamon Apple Pancakes
 
2 large apples, peeled, cored, and grated
2 C flour
1 tsp salt
2 tsp baking powder
4 tsp cinnamon
1/4 C brown sugar
2 eggs
2 1/3 C milk
 
Preheat griddle.
 
Stir together flour, salt, baking powder, cinnamon, and brown sugar.  In a separate bowl, lightly beat eggs, then stir in milk and grated apples.  Stir apple mixture into flour mixture until well combined.
 
Butter griddle, then ladle on batter to make whatever size pancakes you desire.  Let them cook until bubbles form on the surface and the edges look dry, then carefully flip with a spatula.  Cook on the other side until golden.  Keep cooked pancakes warm on a platter in a 200 degree oven, and repeat process to make the rest of the pancake batter.  
 
Serve with butter and maple syrup.
 
Yield:  About 4-6 servings

Wednesday, May 11, 2016

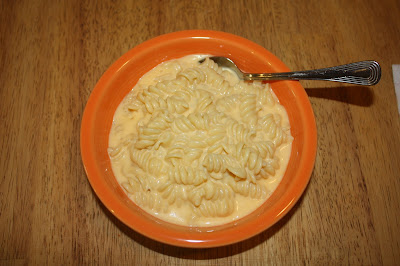
Monster Mac

This recipe is a Cheese with Noodles creation.  I added components of several different recipes, along with some different things I wanted to try, then a couple more changes born of necessity.  My husband and I call it Monster Mac because it features muenster cheese and we've always called it monster cheese.  I tried thinking up a fancier, more descriptive name, but Monster Mac (like Monster Mash!) stuck. 
  
As implied by the name of my blog, I LOVE mac and cheese.  I'm basically always open to trying a new recipe, but am also really particular.  This time around, I was looking for a mac and cheese that was very saucy, velvety, and smooth, and made entirely on the stove.  It's unfortunate or me that by far my favorite cheese for mac and cheese (and pretty much everything else) is sharp cheddar, because it gets kind of grainy when melted.  I also hate Velveeta and American cheese with the burning fury of 1,000 suns, so adding that to help make a silky smooth sauce wasn't an option.  To combat the graininess, I decided to use cornstarch instead of flour (cornstarch makes for a smoother sauce), and used Muenster cheese for part of the cheese since it melts really nicely.  I also made sure to remove the pot from the stove before adding the cheddar because excess heat + chedder = grainy city.
  
The mac and cheese turned out quite well.  Lots of flavor, mellow and buttery from the Muenster but still with adequate bite from the cheddar, and definitely lots of creamy sauce.  The spiral pasta held all the sauce wonderfully and was definitely a good choice.  The sauce wasn't as perfectly silky smooth as I hoped, but definitely smoother than many cheddar based sauces.  I think it's just not possible to make a completely smooth cheddar based sauce.  Luckily, this one comes decently close!
  
Quick Note:  I actually think this would make a great cheesy pasta side dish (or maybe add diced ham to make a main dish?) if you only add 1/2 C milk near the end and completely leave out the cheddar.  The muenster also makes the pasta hilariously stringy as it melts- like, over the top, looks like you're making cotton candy.  As it melts and add the extra milk and sour cream, the stringiness from the muenster goes completely away, but if that appeals to you, there's no reason why you couldn't pull it off the heat and serve it before that happens.
  
  
Monster Mac
  
1/2 lb spiral pasta
1 3/4 C milk, divided
1/2 Tbsp cornstarch
1 egg
1 1/2 tsp hot sauce (I used Frank's Red Hot)
2 tsp mustard
pinch cayenne
4 oz muenster cheese (mine was in slices already, I just tore it into pieces)
1/2 C sour cream
1/2 lb freshly grated sharp cheddar cheese
salt to taste (I used 1/2 tsp)
  
Cook macaroni in salted water.  While it cooks, whisk together 3/4 C of the milk, cornstarch, egg, hot sauce, mustard, and cayenne.
  
Drain pasta, add egg mixture, and return to low heat.  Stir constantly until sauce thickens.  Add muenster cheese and cook until melted.  Add sour cream and remaining 1 C milk and cook, stirring frequently, until hot.  Remove pot from heat and stir in cheddar until melted.  Add salt to taste, then serve immediately.
 
Yield: 4 main dish servings, 6-8 side dish servings

Thursday, May 5, 2016

Sour Cream & Onion Biscuits

Ooh, these biscuits are good!  I had some sour cream that needed to be used up and I'm not sure WHY I googled "sour cream biscuits", but I did, and here we are.  The base recipe is from Taste of Home, but I added chives and onion powder because sour cream and onion sure go well together.  The biscuits are wonderful.  They're VERY tender and delightful.  You could easily leave out the chives and onion powder if you want them plain.  The dough is also really easy to make, so a good choice if you're a little intimidated by the idea of making biscuits from scratch!
 
This recipe makes 6 nicely sized biscuits.  You could definitely double it if you need more, I'd suggest making 2 circles of dough on your pan instead of just 1.
 
 
Sour Cream & Onion Biscuits
 
1 C flour
1 1/2 tsp baking powder
1/4 tsp baking soda
3/4 tsp salt
4 tsp dried chives
1/2 tsp onion powder
3/4 C sour cream
2 tsp canola oil
 
Preheat oven to 425 and place a square of parchment paper in a round cake pan.  Set aside.
 
Whisk together dry ingredients.  Stir together sour cream and oil, then add to dry ingredients.  Stir just until evenly combined, no longer than that because the biscuits could turn out tough.  You may need to get in there with your hands to mix the dough.  Dough will be very sticky.
 
Transfer dough to the prepared cake pan and use your hand to evenly press the dough into a 3/4 inch thick circle, it will help if you get your hand wet.  Use a knife to cut the dough into 6 triangles, but don't pull them apart.
 
Bake until golden on top, about 15 minutes.  To serve, just pull the biscuits apart.  These are great with butter!
 
Yield: 6 biscuits

Sunday, May 1, 2016

Secret Recipe Club: Rhubarb Bread

It's Secret Recipe Club time again!  This month, I was assigned the blog BCMom's Kitchen.  The blog is written by Anna.  Anna's approach to the recipes she makes seems pretty in line with my own.  She is a chronic recipe tweaker, loves trying out new recipes, only repeats a recipe if it turned out fabulously, and tends to gravitate towards easier recipes.  My kind of cook!
 
Tastiness abounds on Anna's blog.  She has a ton of recipes that appealed strongly to me, and I will probably make more of her recipes in the future.  I was particularly drawn to her varied selection of rhubarb recipes because to my undying joy, winter has finally left Interior Alaska (though last night I dreamed it snowed again) and my rhubarb plants are working overtime.  The stalks are still pretty small, but big enough to sacrifice a few for springtime tastiness!  Both of her rhubarb muffin recipes look great, as does the rhubarb focaccia (so unique, I'll definitely make this one!), rhubarb pudding cake, and blackberry rhubarb crumble.  Yum!  It was a very close tie between the two, but I decided to make rhubarb bread instead of rhubarb muffins.
 
The rhubarb bread turned out great.  I was drawn to it because I'd never actually seen a rhubarb bread recipe, and I liked that rhubarb was the star of the show instead of having to share the title with another fruit.  The soft, tart little bits of rhubarb were really nice and contrasted well with the sweet, cinnamony goodness of the bread.  One of the loaves went to our neighbors who kindly took care of our pets when we went out of town recently (first time leaving my dogs, it was so hard!), but my husband and I got to devour the other loaf ourselves.  Anna has a very intriguing recipe on the bread page for honey rhubarb butter, which I will try another time.  I just purchased a tub of honey brown sugar cinnamon butter at Sam's Club so wanted to use that on the bread.  Great combo!  I also really liked the taste and crunch of the topping, plus how quick and easy it is to make, so plan to use it in other recipes.  How good does pumpkin bread with crumb topping sound?  Yes, please!
   
  
Rhubarb Bread
 
1 egg
1 C brown sugar
1/2 C canola oil
1 tsp vanilla extract
1 C buttermilk
2 1/2 C flour
1 tsp salt
1 tsp baking soda
1 tsp cinnamon
2 C chopped rhubarb
 
for topping:
3 T butter, melted
1/2 C sugar
1/2 C oats
1 tsp cinnamon
  
Preheat oven to 325 and grease two 9 by 5 inch loaf pans.
  
Mix together egg, brown sugar, and oil, then stir in the vanilla extract and buttermilk.  In another bowl, combine flour, salt, baking soda, and cinnamon.  Stir into wet ingredients, then stir in rhubarb.  Divide batter evenly among the two loaf pans.
  
To make the topping, stir brown sugar, oats, and cinnamon into the melted butter, then sprinkle evenly over the loaves.
  
Bake in the preheated oven about 45 minutes, or until a toothpick inserted into the center comes out clean.  Let loaves cool in the pans for 10 minutes, then turn them out onto a cooling rack to finish cooling.
  
Yield: 2 loaves, about 16 servings